Stride to Release
This phase begins together with the stride down and involves bringing the ball—previously hidden in the glove—up to the release position.
If this movement is not performed correctly, it can place significant stress on the shoulder and may lead to injury.
It is important to learn proper mechanics and execute this phase correctly.
Lower the Arms Together with the Stride
As you lower your center of gravity during the stride down, your arms should lower at the same time.
Separate the throwing hand (holding the ball) and the glove hand, letting both arms move downward naturally.
This arm movement mirrors the movement of your center of gravity, making it easier to feel and coordinate the forward motion.
Synchronizing the arms with the stride helps create a smooth transition into the throwing motion.
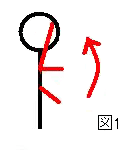
Raise the Arm with a Smooth, Wave-Like Motion
The most important point in this phase is how to bring the arm from the lowered position to the “top” position (the highest point before release).
First, an example of what not to do:
Raising the arm while keeping it extended at a nearly horizontal position.
This is often referred to as an “arm-style takeback.”
This type of motion tends to create unnecessary tension and places excessive stress on the shoulder.
It also increases the elbow angle at the top, causing the arm to straighten too early before release.
Throwing from a fully extended arm increases stress on the elbow due to centrifugal force.
As a result, this “arm-style” motion can be dangerous for both the shoulder and elbow.
Pitchers who try to generate power by swinging the arm too aggressively often fall into this pattern.
Another mistake is pulling the arm too far behind the body.
Normally, the arm cannot be raised high when it is excessively pulled behind the back.
 Forcing the arm upward from this position results in an unnatural movement, making it difficult to achieve a smooth motion and increasing stress on the shoulder.
The exact limit depends on individual shoulder flexibility, but if the ball becomes clearly visible from behind your body, hitters may be able to read your grip and anticipate the pitch.
Ideally, the arm should be raised naturally without tension.
Lift the elbow first, then allow the forearm to follow.
The motion should be smooth and fluid, like a wave.
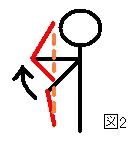 As the elbow rises, the elbow angle becomes smaller. Once the elbow reaches its highest point, the forearm continues upward without changing that angle.
Figure 1 shows the motion from the second base side, and Figure 2 from the third base side.
Keeping the vertical axis of the ball stable, as shown in Figure 2, helps maintain a consistent arm position.
When this phase is performed naturally and consistently without tension, it reduces the risk of injury and stabilizes the arm action at release, leading to improved control.